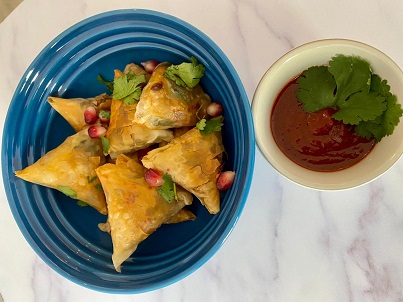
Mince samoosas

Mince samoosas
Mince samoosas

Mince samoosas

Servings

4

servings
Prep time

20

minutes
Cooking time

30

minutes

Ingredients

  • 250 g mince, I used turkey but lamb, beef or chicken would also work

  • 1 onion, finely diced

  • 4 chillies, finely chopped

  • 1 tsp ginger and garlic past, or you can crush ginger and garlic separately

  • ½ tsp ground cumin

  • ½ tsp ground coriander seed

  • ½ tsp garam masala

  • ½ tsp Kashmiri chilli powder

  • 2 tbsp oil, coconut or vegetable oil

  • Salt to taste

  • 2 tblsp coriander, chopped

  • 2 tblsp mint, chopped

Directions

  • Fry mince and chillies in oil for 5 minutes, then add ginger and garlic, spice pwders and cook until fragrant
  • Once cooked, add the onion and cook until the water evaporates but the onion is not fully cooked thorugh
  • Let it cool then add in the herbs
  • Cut filo pastry sheets into 7cm wide strips
  • Put a table spoon of the mince mixture onto the bottom of a strip, the fold the left corner upwards to create a triangle
  • Keep folding until you have a full triangle, seal the end with a paste of flour and water
  • To fry, pour 1 cm of oil into a frying pan on medium heat, once the oil is hot place samosas in and fry until golden, flipping once, drain on kitchen paper
  • Serve warm with a spicy dipping sauce
  • To freeze: Arrange on the baking sheet then freeze
  • 10. Once frozen transfer to reusable ziploc bags

Chipotle chicken tacos

Chicken tacos

Nothing beats a great Mexican dish, it is always packed with deep, rich flavours that marry together so delightfully. Back in South Africa the availability of truly authentic Mexican ingredients is quite scarce so recreating the punchy flavourful dishes at home never quite works out well. Whenever I’ve tried to do so in the past I’ve always ended with disappointing, lack lustre meals that never quite stood up to the restaurant quality flavours.

Since moving to UK the wide availability of these ingredients has inspired me to once again try my hand at cooking some authentic Mexican meals. First up I had to create the popular taco. Chicken was my protein of choice and I used a few different recipes as a reference point. This method slow braises the chicken to ensure it remains tender and soaks up all the delicious layers of flavour.

Let’s get cooking…

Place chicken thighs into a pan with a few tablespoons of oil and allow it to brown on both side. Remove from the pan then saute the onion until golden, add the garlic and fry until fragrant. Next add the tomato paste and fry in the oil until it cooks out and mellows. Finally add the remaining ingredients including the chicken to the pan and bring everything to a boil. Once it starts to boil lower the heat and simmer covered until the sauce thickens. This should take about 20 minutes.

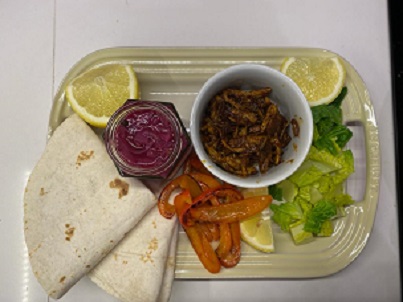
Once the sauce is lovely and thick, remove from the heat and use 2 forks to shred the meat and toss with the sauce. Toast up your tacos, layer in your lettuce and chicken then add any other toppings of your choice. The sauce is a bit on the spicier side so you could temper the heat with some sour cream and guacamole. I add seared red bell peppers for a little extra veg and also pickled red onions for the best zing of flavour!

Chipotle chicken tacos

Servings

4

servings
Prep time

10

minutes
Cooking time

40

minutes

Ingredients

  • 4 chicken thighs

  • 1/2 red onion, finely sliced

  • 2 cloves garlic, thinly sliced

  • 1 tblsp tomato paste

  • 1 tsp chipotle paste

  • 1 tsp honey

  • 1 tblsp pomegranate molasses

  • ½ tsp ground cumin

  • ½ tsp ground coriander seed

  • Salt

  • 1 ½ cups water

  • Olive oil

Directions

  • Fry chicken in oil until browned, then remove
  • Saute onion until golden then add garlic
  • Once fragrant add tomato paste and cook
  • Add chipotle, honey, molaases, spices, salt to taste, stir then add water
  • Return chicken to the pot and bring to a boil. Then lower the heat and simmer covered until sauce reduces, about 20 minutes
  • Serve with toppings of choice

R&R – Rum and raspberry

Mauritian rum and raspberry
Rum and raspberry

This is a quintessential Mauritian cocktail and it originates as a result of the rum producing background that Mauritius has.

My version has been adapted slightly to use what I have available but the original R&R would use Tipo Tinto rum and a bright red, almost sickly sweet raspberry soda. If you are in south Africa or can get your hands on Sparberry this is the exact version of raspberry soda you are looking for. There are other alternatives like Pallonjis lemon and raspberry soda that have the same flavour and would work very well also.

I used a fizzy raspberry drink that I found at my local store which worked well and felt a bit healthier because it was not so sugar laden.

Let’s get mixing….

Simply half fill your glass with ice, pour over a double shot of white rum, the size of a double shot does vary from place to place but a little extra rum never hurt. Top with the raspberry soda and a few fresh raspberries and mint.

The fresh raspberries are a great treat once they become soaked with the rum so don’t throw those away when you’re done drinking!

R&R – Rum and raspberry

Servings

1

servings
Prep time

10

minutes
Cooking timeminutes

Ingredients

  • Double shot of white rum

  • 150 ml of raspberry soda

  • Handful of fresh Raspberries, optional

  • Sprig of mint to garnish

  • Ice to serve

Directions

  • Add ice into a short glass
  • Pour over the rum and top with raspberry soda and berries
  • Enjoy preferably poolside

Banana bread

Delicious homely banana bread
Banana bread

Banana bread is a firm favourite in any household. Growing up my mom was always on the hunt for a perfect banana bread recipe and she finally found this one. She swears by it and maintains that it is the warm milk and baking soda combo that makes this so light and fluffy. Although there are a few steps involved I have worked on making this as quick and easy as possible.

The recipe is extremely adaptable and I have swapped out normal flour for gluten free flour and dairy milk for plant based alternatives and the taste is pretty much spot on every time.

Let’s get cooking…

Start off by creaming the butter and sugar together until it is pale yellow and fluffy, add in the eggs individually and mix to incorporate well. Next add in the mashed bananas, I prefer to mash the bananas in the same bowl to reduce washing up but you can also do this separately and add it into the mixture.

Incorporate the sifted flour and baking powder but mix ever so gently, you don’t want to create a tough batter by over mixing and activating the gluten. Boil the milk in the microwave or on the stove top and add the bicarb to it while it still hot. The milk should begin to foam add it immediately into the cake batter, work quickly at this point to not lose any of this effervescence. Pour the batter into an already greased loaf tin and bake at 180 for 1 hour. A skewer or knife inserted into the middle of the cake should come out clean when the cake is cooked.

Top with a spread of butter and drizzle over nut butter of choice. Enjoy while warm!

Banana bread

Servings

6-8

servings
Prep time

10

minutes
Cooking time

1

hour 

Ingredients

  • 125g butter

  • ¾-1 cup sugar

  • 2 eggs

  • 2 bananas, mashed

  • S tsp baking powder

  • ½ cup milk, boiled

  • ½ tsp bicarbonate of soda

Directions

  • Cream the butter and sugar
  • Add eggs to the mixture individually and mix in
  • Add mashed bananas to the mixture
  • Add flour and baking powder and mix well
  • Add bicarbonate of soda to the boiled milk and stir before adding into the cake batter
  • Mix well and pour into a greased loaf tin
  • Bake for 1 hour at 180 degrees

Salmon wellington

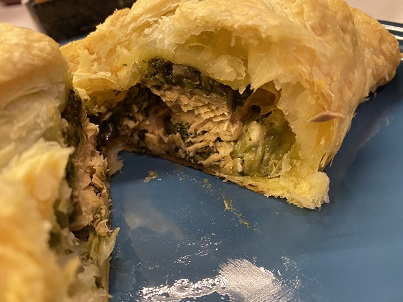
Salmon wellington, deliciously soft and falky
Salmon wellington

Fish is an incredible source of lean protein and any fat that it does contain is actually very good for us. However, I have found that we definitely do not eat enough of it so it has been my aim to develop new, fun recipes that are easy to incorporate into our weekly dinner rotation.

Obviously weeknight meals need to be as effortless and quick as possible so that we do not default back to take out. This dish satisfies all of those criteria which makes it a no brainer. The cherry on top is that it is utterly delicious!

I first had a very expensive, gourmet, store bought salmon wellington a few years ago. That dish was so good it has stayed with me ever since and I have been wanting to recreate at home and finally got the chance to do so.

The availability of gluten free puff pastry in the UK makes this a PCOS friendly meal which is just another added bonus!

Let’s get cooking…

To start you need to thoroughly thaw out your puff pastry and fish fillets if you are using items that you have in your freezer already, this is a step that I needed to do. The fish tends to have quite a lot of moisture after being defrosted so it needs to be dried thoroughly using paper towels for easy clean up.

Next make the spinach and mushroom mixture, I used frozen spinach so it was already quite finely chopped but if yours is fresh then chop the spinach, finely chop the mushrooms as well and saute with onion, garlic, spinach and seasonings. Allow the mixture to dry out fully during cooking. Once cooked, set aside to cool down.

If you are using fillets that still have the skin on, you would need to remove this as well. Do not fret if this is not something you have done before, it is relatively easy to do and I will walk you through the steps. First make a small incision on the shortest end of your fillet between the fish and skin, you should now be able to grip the skin with one hand and glide the knife between the skin and the fish with the other hand. Your knife needs to be properly sharpened before you start so that this is as easy as possible.

Once you have removed the skins, season the fish well on both sides and set aside. Roll open a sheet of readymade puff pastry and measure and cut out how much you would need to fully encase your salmon fillets. I made individual portions but you could also use a whole side of salmon.

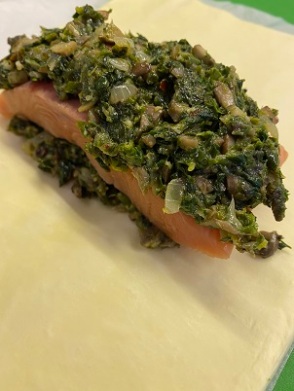
Salmon with spinach and mushrooms

Lay out your pastry, spoon a small amount of the spinach and mushroom mixture in the middle and place the salmon on top, then spoon more spinach and mushroom on top of the salmon. Carefully fold over and seal the pastry all around, crimp the edges with a fork. Use a knife and score the pastry to allow the steam to evaporate during cooking.

Bake until golden and serve with crisp broccoli or a leafy side salad.

Salmon wellington

Servings

2

servings
Prep time

10

minutes
Cooking time

1

hour 

Ingredients

  • 2 portions of salmon, skin removed

  • 2 handfuls of spinach, chopped or use frozen

  • ½ punnet of mushrooms, diced

  • ½ onion, diced

  • 1 roll of puff pastry, I used store bought

  • 1 lemon, zested

  • 1 tsp chilli flakes

  • 2 cloves of garlic, crushed

  • 1 tblsp parmesan

  • 2 tblsp olive oil

  • Salt

  • Pepper

Directions

  • Saute onion and garlic until soft
  • Add spinach, mushrooms, lemon zest, salt, pepper and chilli flakes to taste
  • Cook until wilted and dry, add parmesan. Allow to cool
  • Cut puff pastry sheet in half, layer spinach mixture in the centre, place salmon on top and dust with salt and pepper, top with more spinach
  • Fold over the pastry and crimp all the edges, score the top
  • Refrigerate for 15 minutes
  • Bake at 180 for 40-45 minutes
  • Serve with a lemon wedge and a fresh side

Roast vegetable lasagna

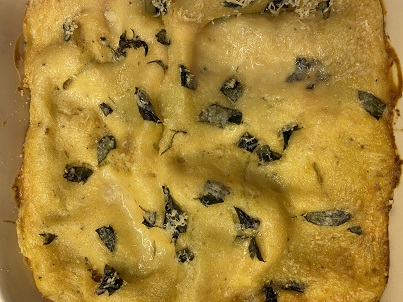
Roast veg lasagna
Roast veg lasagna

Roasted vegetables can be amazingly flavourful and satisfying if cooked correctly. Often people are faced with limp, soggy vegetables that are quite lacklustre which naturally creates a strong dislike for them. The key to great roasted veg is cooking it at a high temp and adequate seasoning. Caramelisation equals major flavour so don’t be afraid of any slightly charred edges.

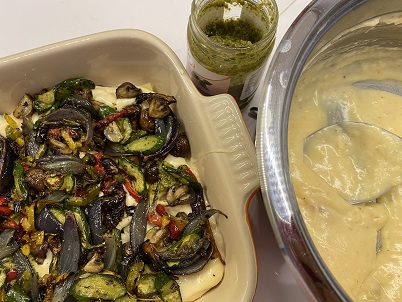
Roast veg lasagna assebmly
Roast veg lasagna assembly

I often try to incorporate roasted veg into my meat free Monday dishes as a quick way to get something delicious on the table that’s not boring. It’s a very adaptable ingredient that can be used easily to create a variety of different dishes.

Let’s get cooking…

Start off by chopping the veg into roughly 1cm sized pieces, you can use any veg that your family likes. My favourites for dishes like these are mushrooms, zucchini, bell peppers and red onions. Lay them out in a single layer on a baking sheet, use 2 trays if you need to because you don’t want to overcrowd the pan. Sprinkle liberally with olive oil, salt, pepper and some dried herbs and toss everything together to get all the veg coated in the seasoning. Throw on the garlic cloves but keep them in their skins to prevent burning.

While the vegetables roast you can start with the béchamel or white sauce. Melt the butter in a pan and add flour, stir continuously to allow the flour to cook, this removes the raw taste from the sauce. Once the mixture is bubbling and cooked through, add a little bit of the milk and whisk vigorously, then add in the remaining milk and whisk until thick. Season with salt and pepper and once the vegetables are done mash in the roasted garlic to the sauce and mix well to incorporate.

Now you’re ready to start layering the lasagne, place 2 tablespoons of the white at the bottom of a roasting dish, then add your first layer of lasagne noodles (I use a square oven proof dish which fits 2 sheets of lasagne perfectly). Spoon over half of the roasted vegetables and dot the pesto all over and cover with a third of the remaining béchamel. Repeat the layers ending with a layer of lasagne noodles and a final layer of béchamel. Sprinkle over some parmesan cheese and bake.

Serve with a leafy, vinegary salad to cut through the richness.

Roast vegetable lasagna

Servings

4

servings
Prep time

15

minutes
Cooking time

1

hour 

Ingredients

  • 1 portion of béchamel (white sauce)

  • 1 red onion, quartered

  • 2 courgette/ zucchini, thinly sliced

  • 2 bell peppers, I used red and yellow

  • Handful of mushrooms, quartered

  • 2 tblsp pesto

  • 1 tsp dried thyme

  • 6 lasagna sheets

  • Parmesan cheese

  • 3 cloves of garlic

  • Salt

  • Pepper

  • Olive oil

Directions

  • Toss vegetables with olive oil, salt, pepper and dried thyme, lay out in a single layer on a baking sheet and throw in the garlic with skins still on, roast for 30 minutes at 180
  • Once vegetables are cooked squeeze the garlic into the béchamel and mix well
  • Put 2 tablespoons of béchamel into the baking dish then a layer of lasagna sheets (only 2 sheets needed per layer)
  • Spoon on half the vegetables, dollop 1 tablespoon of pesto around and cover with a third of the béchamel
  • Repeat the layer then add a final layer of lasagna sheets, top with the last third of béchamel and parmesan cheese
  • Bake for 30 minutes at 180 degrees.

Health Journey

Strawberry and elderflower chia pudding

My current lifestyle and love of all things fresh and healthy has not always been this way. Having left my parents’ home and moved across the country from the east to west coast of South Africa, at only 17, I defaulted to the unhealthiest lifestyle ever.

Cheap takeout meals, too many toasted sandwiches, little to no sleep, an abundance of fizzy drinks, red bulls and bags of crisps to keep the midnight oil burning, sparked a flame that shut down my healthy metabolism and further snowballed into illnesses that have stayed with me more than 15 years later as I write this post.

It all started when my weight began ballooning, initially I did not pay it too much attention knowing how unhealthy my diet had become. I always assumed that once I stopped the fast food everything would fall right back into place. Surprise it did NOT! Then began the even unhealthier slew of diets, shakes, restrictions and calorie deficits. Unbeknown to me I was only making things worse. A visit to the doctor at 23 picked up that my hormones were all over the place and I was diagnosed with Polycystic Ovarian Syndrome (PCOS). The doctor did not seem too concerned, told me I had to lose a bit of weight and sent me on my way.

My weight did not stop increasing… I moved cities again and heard about another doctor specialising in hormonal issues. I paid her a visit and for the first time I received proper explanations into what was going on, how dangerous it was and how to treat it naturally. She completed a full blood panel, picked up that I was severely Vitamin D deficient, had an underperforming thyroid and insulin resistance.

Her first step was to heal the PCOS and insulin resistance with the help of a dietician, I scheduled an appointment, followed the plan to the T, never missed a weekly check in, saw the inches/cm’s fall off and the weight creeped down slowly (this is common with hormonal complications). All of this with no additional exercise.

The second step was to medicate the thyroid and Vitamin D deficiencies, this changed my life, I finally had the energy to do the things I wanted to.

It was an amazing 7 months until the festive season hit and I completely fell off the wagon. I tried multiple times to get back onto my eating plan with little to no results. My best friend convinced me to join an exercise class with her a few times a week. Just a group of girls having fun while blitzing fat… just what I needed. While I watched other women drop entire dress sizes in a matter of weeks, I had barely any improvements. Little did I know that my 1 hour cardio sessions were actually extremely bad for my health issues because of all the cortisol it was dumping into my blood stream (a fact which I only recently discovered) which in turn made me hold on to even more fat.

Work and life got in the way and I stopped the classes. My weight continued to increase, I was now 20-25kg’s heavier than I had been at the start of university. In the winter of 2018 disaster struck when a silly accident resulted in a really badly broken toe, I was banned from any non-essential movement and placed on crutches for 2 months. Sadly, this made me pack on a further 8 kg’s.

In the summer of 2019 my husband and I packed up our lives in South Africa and moved across the world to the UK. It’s been an amazing adventure and helped greatly with building a healthier lifestyle. The wide availability of products that support a “free from” lifestyle has been one of the biggest enablers for long term success.

The key tool for PCOS and insulin resistance sufferers is learning how to balance carbs, proteins and fats in every meal in order to avoid spikes in insulin that have a domino effect and worsen multiple other symptoms. I find that the most meal in which to do this without it becoming monotonous is breakfast. Eggs are an amazing source of protein but it can get boring to eat every day.

Some of the other options I like to include are chia seed pudding, avocado on toast with hemp seeds and luxury granola loaded with healthy fats from nuts and seeds.

Let’s get cooking or stirring…

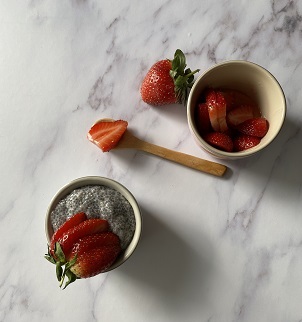
There’s no doubt that strawberries pair well with elderflower. Both are currently in season so I jumped at the opportunity to incorporate them into as many dishes as I can.

This isn’t so much a recipe as it is a ratio, and there’s absolutely no cooking involved but you do end up with quite a satisfying meal.

I use 2 tablespoons of chia for a snack or 4 tablespoons for a full meal and add 4 times the amount of liquid, so for 2 tablespoons of chia I used 8 tablespoons of coconut milk. I have experimented with a few different ratios of seeds to liquids and this one provided the best consistency. My preference here is coconut milk because it is slightly sweeter and I love the taste of coconut.

Mix the seeds and liquid, allow it stand for about 20 minutes and you’re good to go. Top with fruit and a dab of honey. Enjoy!

Health Journey

Servings

1

servings
Prep time

5

minutes
Cooking time

20

minutes

Ingredients

  • Chia pudding
  • 2 tblsp dried chia seeds

  • 8 tblsp coconut milk (any milk would do)

  • 1 tsp honey

  • Strawberry and elderflower mix
  • ½ cup strawberries, sliced

  • ½ tsp elderflower syrup

Directions

  • Slice strawberries and pour over syrup, allow to macerate
  • Mix the chia seeds and milk, stir thoroughly and refrigerate for minimum 20 minutes
  • Layer chia pudding and strawberry mixture into a bowl or jar top with honey and enjoy

Sausage tray bake

Juicy sausage tray bake

Sausages are some of the best staples to have in the freezer, you can serve them up for breakfast, lunch or dinner and there are endless ways of making them more interesting but you’re guaranteed great flavour regardless of how it is served.

The key is to use good quality sausages that aren’t too processed. A little trick to really get the flavour into this particular dish is to remove the outer casing of the sausage which allows the flavours to really get into the meat.

This meal can be thrown together in minutes and you can forget about it as it bakes which frees up time to do just about anything else after a busy day.

Let’s get cooking…

First up let’s remove the skins from the sausages. Make a small slit down the length of the sausage and the skins should easily peel off. Then place it into a roasting tray along with some chopped up peppers and onions. Mix up the ingredients for the marinade and pour over the sausages and veg. And hey presto you’re done!

Pop into an oven and forget about it for 40 minutes. Once it’s cooked, serve up immediately on a pile of buttery mashed potatoes.

Sausage tray bake

Servings

4

servings
Prep time

10

minutes
Cooking time

40

minutes

Ingredients

  • 6-8 sausages, I use turkey or chicken

  • 2 red onions, cut into wedges

  • 2 bell peppers, cut in chunks

  • A few sprigs of thyme

  • 2 tbsp olive oil

  • 1 ½ tsp honey

  • 1 tsp balsamic vinegar

  • 1 tbsp pomegranate molasses

  • 1 tsp mustard

  • ¼ cup water

  • Salt

  • Pepper

Directions

  • Place the sausages, peppers and onions into a foil lined tray
  • Mix all the remaining ingredients and pour over sausages
  • Roast at 180 for 40 minutes
  • Serve with buttery mash or sweet potatoes

Wild mushroom paella

In my family we take Meat free Monday quite seriously, it being a religiously auspicious day is one of the main reasons why.

Over time I’ve tried to take some old favourites and find a vegetarian alternative so as to introduce some excitement into meat free meals. One such hit is my wild mushroom paella. I am not one for boring old button mushrooms so as far as possible I always use wild/exotic mushrooms to add a major boost of flavour and texture. However, any mushroom will do if you can’t find wild mushrooms.

Delicious and simple… Wild mushroom Paella

Let’s get cooking…

Start with the prep, all the veggies that go into this dish need to chopped and ready to go and likewise the remaining ingredients should ideally be measured out already so that nothing is missed along the way.

First up heat up 3-4 tablespoons of olive oil on a medium-low heat in a flat heavy based pan, I used a cast iron casserole but any pan will do, they key here is that the pan should be as flat as possible. Once the oil is hot throw in the diced onions, diced peppers and shaved fennel, cook until onions are translucent and starting to soften. Next add in the garlic and herbs, I like to pick off the leaves and mince it if you using fresh herbs so that there aren’t any huge pieces of stems floating around. You could also use dried herbs, in that case rub it between your as you sprinkle it into the pan.

Fry this until fragrant, the aroma of the garlic should be unmistakeable. Once this happens add in the tomato paste and paprika and stir around for 1 minute, the tomato paste needs to cook out in order to mellow out the flavour and add a rich undertone.

Add in 2 cups of Arborio or Spanish paella rice and stir until it is coated with all the spices and veg and has toasted a little. Add in the 4 cups of warm stock so as to not drastically reduce the heat in the pan, allow it to simmer for 10 minutes uncovered but stir regularly.

While the rice is bubbling away, heat up a second pan on high heat, melt a little butter in the pan the toss in the mushrooms, minced (or dried) thyme and season with salt and pepper. Sear the mushrooms until it is cooked and golden but be very careful not to burn it.

After the 10 minutes have elapsed, add the mushrooms to the rice along with 1 cup of warm water. Stir to incorporate everything and partially cover. Cook for a further 10 minutes without stirring. There will be a little crust of rice that develops at the bottom of the pan… this is paella gold! It is known as the Soccrat and is one of the key indicators of a good paella. After 10 minutes the rice should be cooked and most of the liquid should be absorbed. Remove from the heat and allow to rest for 10-15 minutes.

Then serve up with big green salad, roasted red peppers and chunks of bread.

Wild mushroom paella

Servings

4

servings
Prep time

10

minutes
Cooking time

40

minutes

Ingredients

  • 2 punnets mixed Wild mushrooms, chopped

  • 2 cups Arborio or Spanish paella rice

  • 1 bell pepper, I used red diced

  • 1 large onion, diced

  • 1 fennel bulb, shaved

  • 2 sprigs rosemary

  • 3 sprigs thyme

  • 4 cloves of garlic, crushed

  • 2 tsp paprika

  • 1 tbsp tomato paste

  • 4 cups veg stock

  • 1 cup water

  • Butter

  • Salt

  • Pepper

  • Olive oil

Directions

  • Fry onion, pepper and fennel in a little olive oil until soft
  • Add garlic and herbs and once they are fragrant add tomato paste and paprika and fry for 1 minute
  • Add 2 cups of paella or Arborio rice and fry
  • Once rice nicely covered in all the spices pour in 4 cups of stock, let it simmer uncovered for 10 minutes stirring occasionally
  • In a separate pan fry mushrooms in a little butter and thyme until golden, season to taste with salt and pepper
  • Add to the rice along with 1 cup of water
  • Cover and cook for a further 10 minutes
  • Take it off the heat and let it rest for 10 minutes before serving

Travel Diary… Mauritius

Apart from the people in my life my 2 favourite things are good food and traveling.

I was born and brought up in South Africa and as kids we frequently went on family holidays, however, the first time I travelled outside of the country was in my late teens.

We took a short, 4 hour plane trip to the sunny island of Mauritius and I was hooked for life.

South Africa is one of the most beautiful countries in the world but Mauritius was different and that was the appeal. In many instances the 2 countries were largely similar but it was the differences and learning about them that got me hooked. From the cascading waterfalls to the seven coloured sands and turquoise beaches, the landscape is quite surreal.

There is a strong Indian influence on the island so naturally the food culture is grounded in Indian tradition. One of the most unforgettable meals I had was on a road side stop to pick up a dhall puri, a buttery and soft indian flat bread, puri, stuffed with a thick lentil stew, dhall.

Rum is widely produced and so happens to be the favoured spirit all across Mauritius, the famous Tipo tinto R&R is incredibly refreshing in the Mauritian heat but packs a serious punch.

We visited over the Christmas break and the Christmas Eve dinner menu was a seafood feast, whole lobsters/cray fish, crisp prawn tails, chicken and prawn curries and the freshest sea urchin or Uni.

The island is quite small and the key sights can be seen within 2-3 days which is ideal for those seeking a shorter break. Summed up this definitely a place to visit if you’re longing for lazy days, reading books in hammocks and doing as little as possible.